+86-15052135118

 Español
 Get In Touch

Content
What Type of Screws to Use for Drywall
Drywall screws are a dedicated fastener category with a specific geometry optimized for gypsum board installation. They are not interchangeable with wood screws or general-purpose sheet metal screws, and using the wrong type causes two common problems: either the screw tears the paper face of the drywall when over-driven, or it fails to grip the framing securely enough to hold the panel flat.
The defining features of a drywall screw are:
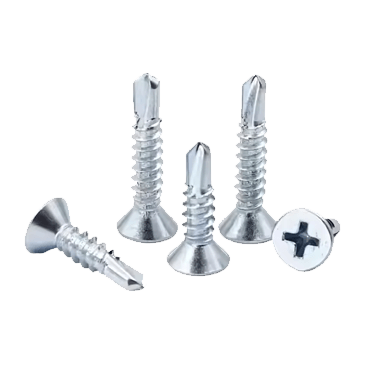
- Bugle head — A concave, countersunk profile that allows the screw to sit just below the drywall surface without tearing the paper face. The taper is shallower than a standard flat countersunk head, which distributes clamping force more gently across the gypsum.
- Phillips recess (or square drive) — Phillips #2 is standard and allows a screw gun to cam out at a consistent torque, which helps prevent over-driving. Square drive (Robertson) is increasingly used for more precise depth control on commercial jobs.
- Hardened, phosphate-coated steel — Most drywall screws are made from case-hardened carbon steel with a black phosphate finish. The hardening provides the stiffness needed to drive through gypsum without bending; the phosphate coating offers light corrosion resistance and improves compound adhesion for finishing.
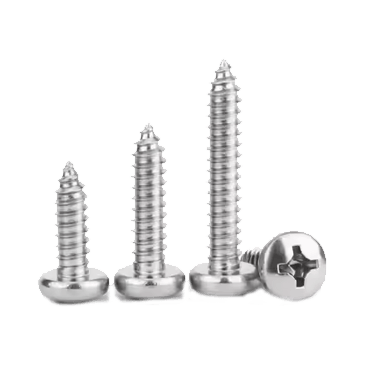
- Sharp, needle-like point — The self-drilling point eliminates the need for pre-drilling into wood or light-gauge steel framing.
For exterior or high-humidity applications (bathrooms, basements), specify corrosion-resistant drywall screws — either hot-dip galvanized or stainless steel — since standard black phosphate screws will rust through the compound and stain the finish.
Coarse Thread or Fine Thread Drywall Screws: Which to Use
Thread pitch is the most important variable when selecting drywall screws. The rule is straightforward: coarse thread for wood framing, fine thread for metal framing.
Coarse Thread (W-Type) Drywall Screws
Coarse thread drywall screws — sometimes labeled "W-type" or "wood-to-drywall" — have widely spaced threads (approximately 7–9 threads per inch depending on gauge) designed to bite aggressively into wood fiber. The wider thread spacing gives each thread more wood to grip, maximizing pull-out resistance in dimensional lumber or engineered wood studs.
In fine-threaded form, a screw driven into wood tends to auger in too slowly and generates excess friction heat, which can split the wood near the face or cause the screw shank to snap. Coarse threads pull themselves in efficiently and seat cleanly.
Use coarse thread when: attaching drywall to wood studs, wood ceiling joists, or wood blocking — which covers the vast majority of residential construction.
Fine Thread (S-Type) Drywall Screws
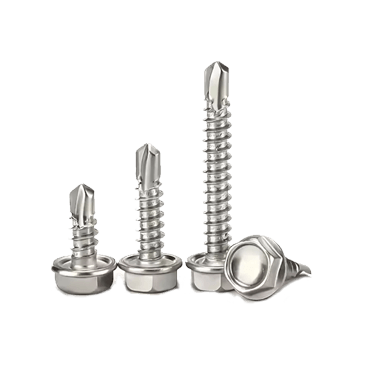
Fine thread drywall screws — labeled "S-type" or "self-drilling metal-to-drywall" — have closely spaced threads (approximately 18–20 threads per inch) and a sharper, self-drilling point designed to pierce light-gauge steel studs (typically 20–25 gauge, 0.36–0.45 mm). The fine thread creates more thread contact area per unit of screw length in thin steel, which is essential because there is little material depth available for coarse threads to develop meaningful holding strength.
Using coarse thread screws in metal framing produces the opposite problem: the threads strip out the thin steel before the screw seats, leaving it spinning freely in the hole with almost no holding capacity.
Use fine thread when: attaching drywall to light-gauge steel studs or steel hat channel — standard in commercial construction and increasingly common in residential basement finishing.

Standard Drywall Screw Sizes and When to Use Each
Drywall screws are specified by diameter (gauge number) and length. The most common gauge is #6, with some heavier-duty applications using #8. Length is where selection decisions matter most, because the screw must penetrate the framing by a minimum depth to develop adequate holding strength without bottoming out or protruding through the back face of the stud.
The general sizing rule: the screw should penetrate framing by at least ⅝ inch (16 mm) beyond the drywall face. Most professionals target ¾ inch (19 mm) of penetration as a practical minimum for reliable pull-out resistance.
| Drywall Thickness | Layers | Recommended Screw Length | Thread Type | Typical Application |
|---|---|---|---|---|
| ⅜ in (9.5 mm) | Single | 1 in (25 mm) | Coarse (wood) / Fine (steel) | Thin partition overlay |
| ½ in (12.7 mm) | Single | 1¼ in (32 mm) | Coarse (wood) / Fine (steel) | Standard wall and ceiling |
| ⅝ in (15.9 mm) | Single | 1⅝ in (41 mm) | Coarse (wood) / Fine (steel) | Type X fire-rated wall/ceiling |
| ½ in (12.7 mm) | Double layer | 2 in (51 mm) | Coarse (wood) / Fine (steel) | Soundproofing, fire assemblies |
| ⅝ in (15.9 mm) | Double layer | 2⅝ in (67 mm) | Coarse (wood) / Fine (steel) | Heavy fire-rated double-layer |
The 1¼ inch coarse thread screw into ½ inch drywall on wood framing is by far the most commonly used combination in residential construction — it is the default size stocked on virtually every framing job. The 1⅝ inch fine thread screw is the equivalent standard for commercial light-gauge steel stud work.
How Long Should Drywall Screws Be for Ceilings vs. Walls
Ceiling installations impose higher pull-out demands on drywall screws than wall installations, because gravity is working against the fastener continuously rather than just during seismic or impact loading. For this reason, many contractors and drywall system specifications increase screw penetration depth by ¼ inch (6 mm) on ceilings relative to walls of the same board thickness.
Practical implications:
- ½ inch drywall on wood ceiling joists: use 1⅝ inch screws (not 1¼ inch) to ensure at least 1⅛ inch of thread engagement in the joist.
- ⅝ inch Type X on wood ceiling joists: use 1⅞ inch or 2 inch screws for reliable holding in fire assembly framing.
- Ceiling screw spacing: the GA-216 (Gypsum Association) standard specifies screws at 12 inches on center for ceilings vs. 16 inches on center for walls when framing is at 16 inches o.c. The tighter spacing compensates for reduced pull-out margin with standard-length screws.
Sagging drywall ceilings are almost always the result of using wall-length screws on ceiling framing, under-driving screws (leaving the head proud of the surface), or spacing screws too far apart. All three errors reduce the effective holding force below what the weight of the panel requires over time.
Common Mistakes When Selecting and Installing Drywall Screws
Even with the correct screw selected, installation errors are frequent enough that they account for a significant share of callbacks on drywall jobs. The most consequential are:
- Over-driving — Sinking the screw head more than ⅛ inch below the surface tears the paper face and destroys the holding capacity of the fastener. The paper layer provides most of the tensile resistance at the fastener point; once torn, the screw is relying entirely on gypsum compression, which is weak. Set screw gun depth stops precisely.
- Using coarse thread in metal framing — The threads strip out the thin-gauge steel immediately, leaving a screw that spins but doesn't draw the panel tight. The panel will rattle and the screw head will not seat flush.
- Using screws that are too short — Insufficient framing penetration results in pull-through failure under load, especially on ceilings. This is the most common sizing error and is often not discovered until panels sag weeks after installation.
- Driving screws at an angle — Angled screws in gypsum create a stress concentration that cracks the board face around the fastener when the panel is under load. Drive all screws perpendicular to the board face.
- Placing screws too close to the edge — Standard practice is a minimum ⅜ inch (10 mm) from a cut edge and ½ inch (13 mm) from a factory-tapered edge. Closer than this, the gypsum crumbles around the fastener and the panel edge becomes fragile during finishing.