+86-15052135118

 Español
 Get In Touch

In the world of woodworking, furniture assembly, and cabinetry, choosing the right fastener is crucial for the strength, durability, and aesthetics of the final product. Among the specialized options available, chipboard screws stand out as a superior choice for engineered wood materials. This comprehensive guide delves into the unique characteristics of chipboard screws, their distinct advantages, and how they compare to standard wood screws. Understanding these differences is key to executing professional-quality projects that last, making it essential for both DIY enthusiasts and seasoned craftsmen to be well-informed.
Content
- 1 Understanding Chipboard Screws: Design and Purpose
- 2 Key Differences Between Chipboard Screws and Regular Wood Screws
- 3
- 4 Driving Techniques and Best Practices
- 5 FAQ
- 5.1 What is the best screw for particleboard furniture repair?
- 5.2 Can I use chipboard screws in solid wood or drywall?
- 5.3 Do I always need a pilot hole for chipboard screws?
- 5.4 What is the difference between a chipboard screw and a drywall screw?
- 5.5 How do I choose the correct length of chipboard screw?
Understanding Chipboard Screws: Design and Purpose
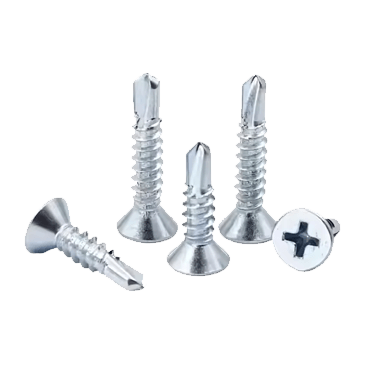
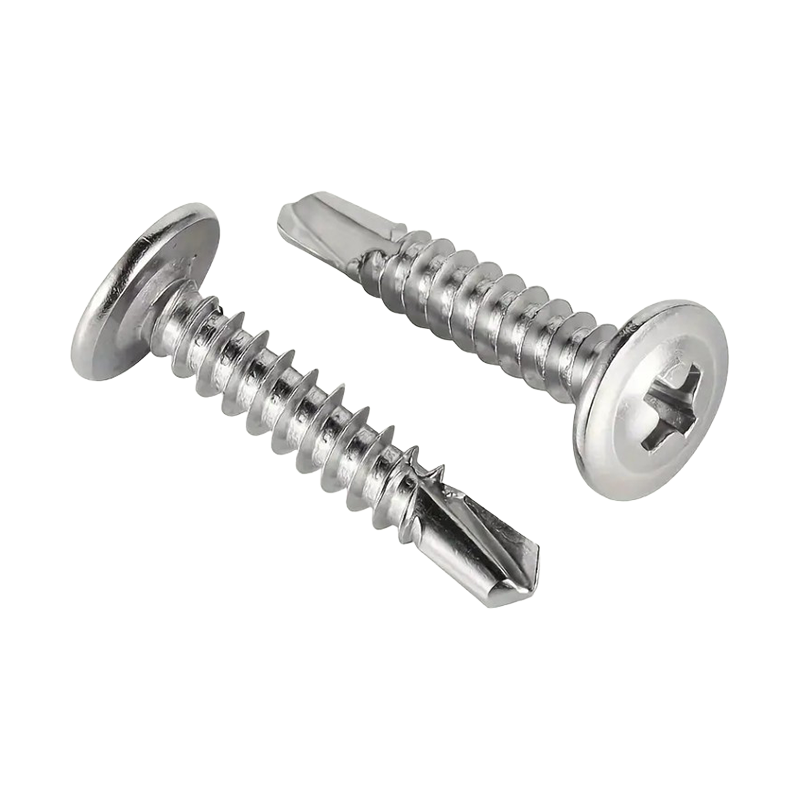
At their core, chipboard screws are engineered specifically for use with particleboard, MDF (Medium-Density Fiberboard), OSB (Oriented Strand Board), and other composite wood products. Unlike solid wood, these engineered materials have a granular or fibrous structure that lacks long, continuous grain. This makes them prone to splitting and offers poor holding power for conventional screws. The design of a chipboard screw addresses these weaknesses through several key features. The most prominent is its deep, aggressive thread that runs the entire length of the shank. This "full-thread" design maximizes the surface area in contact with the material, gripping the particleboard's internal structure more effectively. Furthermore, the threads are often wider and sharper, allowing them to cut through the dense, resin-bonded fibers with minimal resistance and without the need for a pre-drilled pilot hole in many cases. This design philosophy centers on creating maximum pull-out resistance and clamping force in materials that would otherwise fail with a standard fastener.
- Full-Threaded Shank: Provides grip along the entire screw length, essential for the crumbly nature of chipboard.
- Sharp, Wide Threads: Designed to cut and displace material cleanly, reducing the risk of splitting.
- Self-Countersinking Head: Often features a pronounced bugle shape that seats flush with the material surface without pre-countersinking.
- Specialized Drive Types: Commonly feature Torx or Pozidriv drives to prevent cam-out (slippage) during high-torque driving, which is crucial given their aggressive thread.
Key Differences Between Chipboard Screws and Regular Wood Screws
To fully appreciate the utility of chipboard screws, a direct comparison with standard wood screws is illuminating. While both may appear similar at a glance, their performance in engineered wood is worlds apart. Regular wood screws are designed with a partially threaded shank, featuring a smooth section under the head. This design works well in solid wood, where the smooth shank allows the top piece of wood to pull down tightly against the bottom piece. However, in particleboard, this smooth section becomes a liability, creating a zone of zero grip that can lead to wobbling and eventual joint failure. The thread profile is also less aggressive, which can cause it to simply bore a hole rather than bite securely into the composite material. Understanding these distinctions is not just academic; it directly impacts the structural integrity of your project. Using the wrong screw can result in stripped threads, split boards, and joints that loosen over time, compromising everything from a simple bookshelf to complex kitchen cabinetry.
| Feature | Chipboard Screw | Regular Wood Screw |
| Thread Design | Deep, aggressive, full-length thread. | Coarser, partial thread with a smooth shank. |
| Primary Use | Engineered wood (particleboard, MDF, OSB). | Solid, natural lumber. |
| Pilot Hole Required? | Often not required due to self-tapping design. | Usually recommended to prevent splitting. |
| Head Design | Bugle head for self-countersinking. | Flat, round, or oval head; may require countersinking. |
| Holding Power in Chipboard | Excellent, due to maximum thread engagement. | Poor, prone to stripping and pull-out. |
Optimal Uses and Applications for Chipboard Screws
The specific design of chipboard screws makes them indispensable for a wide range of applications involving manufactured wood. Their ability to create strong, reliable joints in otherwise challenging materials has revolutionized cabinetry and furniture making. They are the go-to fastener for assembling flat-pack furniture, where manufacturers rely on their holding power to ensure longevity. Beyond furniture, they are crucial in building shelves with particleboard, as shelves bear dynamic loads and require screws that resist pull-out forces over time. In kitchen installations, they are used to securely mount cabinets made from MDF or particleboard to walls and to join cabinet boxes together. Another critical application is in subflooring, particularly when securing OSB or particleboard panels to floor joists; here, the screw's strong grip prevents squeaking and movement. For any project involving the joining of two pieces of engineered wood, especially where the screw will be subjected to tension or shear stress, a chipboard screw is the correct and professional choice.
- Flat-Pack Furniture Assembly: Provides the durability needed for everyday use.
- Cabinetry Construction: Essential for joining cabinet boxes, face frames, and mounting.
- Subfloor and Sheathing Installation: Offers superior holding power to prevent movement and noise.
- Built-In Shelving Units: Ideal for building shelves with particleboard that must support weight.
- DIY Home Projects: Any project utilizing MDF, particleboard, or melamine-coated boards.
Choosing the Right Chipboard Screw: Length, Gauge, and Coatings
Selecting the correct chipboard screw involves more than just grabbing the first box labeled for particleboard. Three primary factors determine suitability: length, gauge (thickness), and coating. The golden rule for length is that the screw should penetrate the main (load-bearing) piece of material by at least two-thirds of its thickness. For example, when attaching a 3/4-inch thick shelf to a 1-inch thick bracket, the screw should be long enough to go through the shelf and at least 2/3 inch into the bracket. Gauge is critical for strength; a thicker screw (higher gauge number) can withstand greater shear and tensile forces. For most cabinetry, a #8 or #9 gauge screw is common. Finally, the coating protects against corrosion and can affect driveability. Zinc-plated screws are economical for indoor use, while wax-coated screws offer reduced driving friction. For outdoor or high-moisture environments like bathrooms, choosing screws with a waterproof chipboard screw coating such as ceramic or advanced polymer is vital to prevent rust stains and structural weakening.
- Length: Ensure penetration into the main member is sufficient for a strong hold.
- Gauge (#6, #8, #9, #10): Higher numbers indicate a thicker, stronger shank. Match gauge to load requirements.
- Coating Types: Zinc (basic), Wax (eases driving), Ceramic/Polymer (waterproof chipboard screw coating for humidity).
- Drive Type: Torx (star) drives are highly recommended for superior torque transfer and reduced driver slippage.
Driving Techniques and Best Practices
Even the best chipboard screw can fail if installed incorrectly. Proper driving technique is paramount to achieving a strong, flush, and split-free joint. The most common debate revolves around the necessity of a pilot hole. While the self-tapping design of many chipboard screws often eliminates the need for one, there are circumstances where pre-drilling is wise. These include when driving screws close to the edge of a board (to prevent blow-out), when using very large-diameter screws, or when working with exceptionally dense or brittle composite materials. The choice of driver bit is equally important; a worn or incorrect bit will cam out, stripping the screw head and ruining the fastener. It's advisable to use a bit specifically matching the drive type (e.g., T20 for Torx) and to apply firm, steady pressure while driving at a moderate speed. For a professional finish, the screw head should be driven just below the surface without breaking the material's top veneer or laminate, which is a key consideration for tasks like installing MDF panels with screws where surface appearance matters.
- To Pre-Drill or Not: Assess material density and screw location. When in doubt, a pilot hole slightly smaller than the screw's core diameter is a safe practice.
- Use the Correct Driver Bit: A fresh, high-quality bit ensures maximum torque transfer and prevents head damage.
- Driving Speed and Pressure: Use a mid-speed setting with consistent, firm pressure to allow the thread to cut cleanly.
- Achieving a Flush Finish: Stop driving once the screw head is just below the surface; over-driving can break the material.
- Special Considerations for Laminates: When installing MDF panels with screws that have a veneer, a pilot hole is almost always required to prevent surface chipping.
Solving Common Problems: Stripping, Splitting, and Pull-Out
Encountering issues like a screw that won't hold or a split board can be frustrating. Fortunately, most common problems with chipboard screws have identifiable causes and solutions. Stripping, where the threads bore out a hole that's too large, is often caused by using a screw that's too short, of insufficient gauge, or by over-tightening. The solution may be to use a longer or thicker screw, or to fill the hole with a specialized particleboard filler and re-drive a new screw. Splitting, particularly at the edges of a board, usually occurs when screws are driven too close to the edge without a pilot hole or when excessive force is used. Preventing this requires careful planning of screw placement and pre-drilling. Pull-out, where the screw literally works its way out under load, indicates a fundamental lack of holding power. This is a classic sign of using the wrong screw type (e.g., a regular wood screw) or one that is too short. Addressing these issues is key when tackling a particleboard screw size guide project, as selecting the right size from the start is the best prevention.
| Problem | Likely Cause | Solution |
| Stripped Threads/Hole | Over-torquing, wrong screw size, low-quality material. | Use a larger diameter/longer screw, or use a threaded insert. |
| Material Splitting | Screw too close to edge, no pilot hole, excessive gauge. | Pre-drill a pilot hole, move screw location inward, use finer gauge screw. |
| Screw Head Breaking | Poor-quality screw, incorrect driver bit, excessive torque. | Use high-quality screws with Torx drive, apply steady pressure. |
| Screw Pulling Out | Insufficient length, using a regular wood screw. | Consult a particleboard screw size guide and replace with proper-length chipboard screws. |
FAQ
What is the best screw for particleboard furniture repair?
The unequivocal best choice for repairing particleboard furniture is a modern chipboard screw. When repairing, the existing material is often weakened, so it's critical to use a screw designed for maximum grip. Opt for a screw that is one gauge thicker and at least 1/2 inch longer than the original if the damaged area allows. This ensures fresh threads engage in uncompromised material. For areas where the original hole is stripped, consider using a threaded plastic insert or a specialty particleboard repair epoxy before driving the new screw to restore a solid anchoring point.
Can I use chipboard screws in solid wood or drywall?
While you physically can drive a chipboard screw into solid wood, it is not optimal. The full-length, aggressive threads may make it difficult to pull two pieces of solid wood tightly together, as the threads will engage in both pieces and potentially leave a gap. For solid wood, a partially threaded wood screw is more effective. Chipboard screws are not designed for drywall. Their coarse threads and sharp points are overkill for the soft gypsum core and can cause excessive damage. Always use purpose-made drywall screws for drywall installation.
Do I always need a pilot hole for chipboard screws?
Not always, but it is a highly recommended best practice in many situations. Most quality chipboard screws are self-tapping and can be driven directly into the material. However, to prevent splitting—especially when driving screws near the edge of a board, when using larger diameter screws, or when working with delicate laminates—pre-drilling a pilot hole is essential. The pilot hole should be slightly smaller than the screw's core diameter (the shank minus the threads). This is a crucial step when installing MDF panels with screws that have a decorative surface.
What is the difference between a chipboard screw and a drywall screw?
They are designed for completely different materials and purposes. A chipboard screw has deep, sharp, widely spaced threads to grip the dense, granular structure of engineered wood. It is made of harder steel to withstand the driving torque. A drywall screw has finer, closer-spaced threads designed to hold onto the soft gypsum core of drywall and bite into metal studs. It is also much thinner and more brittle. Using a drywall screw in particleboard will almost certainly result in the screw snapping or stripping out, offering negligible holding power.
How do I choose the correct length of chipboard screw?
Choosing the correct length is fundamental to joint strength. A reliable rule is the "two-thirds" rule: the screw should penetrate the main, load-bearing member by a distance at least two-thirds of that member's thickness. For instance, if you are attaching a 1/2" thick panel to a 2x4 (which is actually 1.5" thick), the screw should be long enough to go through the 1/2" panel and at least 1" into the 2x4, requiring a minimum screw length of 1.5 inches. Always refer to a detailed particleboard screw size guide for specific applications to ensure optimal performance and avoid under- or over-penetration.